Friday, June 15, 2012

Field Day and Hypothermia

Our family is always pretty busy, but this last week takes its place in the Chapman Book of World Records as the week that I'll look back on as the benchmark of craziness.  "Remember that week with the 2 graduations, 2 graduation parties, a play, a concert, puberty, a Senior trip to Washington D.C., a work conference in Maine, a migraine from hell, a refinance, Field Day, and teacher inservice?"  I probably won't, because I'll be blocking it out the same way you block out other traumatic events.  So in the interest of jogging my memory with only positive triggers, here are some of the pictures from Field Day.  Only a week late!  (If you're looking for quilts, check out my Jack's Chain tutorial from a few days ago).
Quarta with the 4th grade handbell choir during the Field Day talent show.
This was a few days before Field Day, but here is Quarta's costume for history day.  She represented a colonial lady of Boston and described the Boston Tea Party with words and edibles.
My contribution was figuring out how to attach the Necco wafers heads to the Twizzlers bodies by cutting a slit in the Twizzlers... better than frosting!
One of the best improvements ever in Field Day was getting the Rhetoric students, not the teachers, to captain the teams.  Here's Secundus organizing his pyramid.  He does a great job with the little kids!  And yes, it was chilly on June 8 in Ridgefield, WA.  I don't think it ever hit 60.
Field Day looks a little different seen from a distance through the woods.
Fabricius has a cool shirt!
Saints vs. Phoenix watermelon-eating contest.
All in all, I think I prefer grading the 18-page Dies Irae.  I spend part of every Field day finishing that bit of grading; it's very appropriate.
That's Quarta upside down on the play structure.  There were scattered showers throughout the morning.
It was really too cold to sit on the rock eating a popsicle and reading the yearbook, but that didn't stop kids from trying.
Afterwards the Rhetoric students went up-county to the Leutholds' farm, and the parents of the seniors joined them for a barbecue.  Primigenitus won honors in the toilet paper cap and gown contest.
Secundus took a dare to go swimming in a hailstorm.
This was probably not one of his brighter moments.  You really can cramp up from hypothermia and shock, and your friends would feel really bad if that was the last thing you ever did.  Fortunately he floated on his back until he got close to land, and then spent the rest of the afternoon warming up.
The seniors were subjects of some good-natured roasting.

We left early to attend another graduation, and then the Seniors and Juniors left very early Saturday morning for the D.C. trip; I dropped off Primigenitus and Steve at the airport at the same time; Steve's AASHTO conference was in Portland, Maine this year.

It has been a week since the events in these photos, and I am just beginning to recover.

Wednesday, June 13, 2012

Jack's Chain - the Tutorial

I'm going to take a break from the graduation, school, and family blogging and share my tutorial on how to piece a Jack's Chain quilt top.  I finished this one recently and am really proud of it.  It's a great, old-fashioned pattern.  Yes, there are lots of inset seams, but I'm here to tell you they are not really that bad!  I personally have never wanted to do the English paper piecing that is so popular with hexagon quilts right now... and you don't have to.  This is all pieced on a machine, with intermediate sewing skills.  My points are not always perfect matches, and I have found that I am a happier person if I don't worry about it too much.  The overall effect is charming, and I can't wait to get this quilted and on my daughter's bed.  So, I'd like to persuade you to attempt this little-known vintage pattern, sometimes also called Rosalia Flower Garden.
I started thinking about this pattern when I was browsing through non-square block patterns in Maggie Malone's 1001 Patchwork Designs.  There are three blocks listed that combine squares, hexagons, and equilateral triangles in this unique way (the others are Merry-Go-Round III and Wedding Tile). 
I like the way it creates a circular-looking pattern even though there are no curved lines to piece, and I thought it would be really cute in the 1930's reproduction fabrics I had been collecting.  I also found the pattern on Quilter's Cache (which is a fabulous resource for all sorts of quilt patterns, by the way!)  Although Quilter's Cache does give step-by-step directions and templates, I don't really like using templates and so I bought a Clearview Triangle ruler at a local quilt store.  This makes it possible to cut both the equilateral triangles and the hexagons without templates.  From that point, I did not really follow the Quilter's Cache piecing directions.
Here's the picture of page 2 of the Quilter's Cache Jack's Chain pattern.  I did use it as a guide for assembling the rows.  Complicating matters still further, this project became a UFO for a few years (I think I started it in 2007) and I didn't get back to it until this year when I've been participating in Judy L.'s UFO project.  I had divided the piecing of the top to be done over two months, and I groaned a little when the number for half of the piecing came up in April.  But surprisingly, I found it was easy to make progress once I cleared some time to work steadily.  I had already pieced a lot of the 9-patches and made enough blocks for a partial row of the finished top (which is 67x94").  I just needed to review and actually write down how I had cut and measured the blocks I had already done before!
The Planning:

I wanted to use '30's reproductions for the 9-patches, white for the hexagons, and various pastel and bright solids for the triangles.  (Many of these solid fabrics are vintage... my grandfather was a partner in a business college in Ohio, and my grandmother had in her stash the 1/2 yard lengths of rainbow colored cotton that were used in the Nancy Taylor course, which was, I guess you would call it, a charm course for secretaries.  So whenever I dig into my vintage solids, I imagine fashionable young women of the Mad Men era figuring out what colors were most flattering with their skin tones.  I've read the books, and they are a hoot).  The only significant yardage I required for this quilt was the white, and I think I used a little less than 3 yards of that.   I have seen some examples of the Jack's Chain pattern online that use the same white background fabric for the hexagons, triangles, and the 4-patches of the 9-patch. If you want to do this, be sure to plan ahead and buy more of the white fabric!

Here's the math that I should have done first, but didn't.  I just plunged in.
9-Patches:
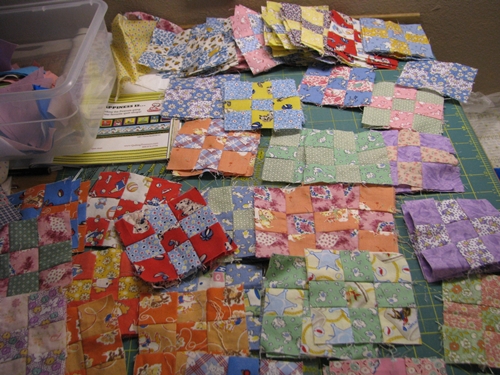
The very first step is to make lots, and I mean lots, of 9-patches that finish to 3".  You will probably choose to do this with 1.5" strips, and your best bet is to pace yourself.  If you make a twin-sized quilt like mine, you will need 335 9-patches that finish to 3" (but with raw edge included, they are 3.5").  That's a lot of 9-patches.  I wanted a scrappy variety of vintage-looking prints, so I tried to use different combinations of the fabrics I had.  I would keep thinking that, surely, I had enough 9-patches.  But then I'd calculate and realize that, no, I actually did not.

Triangles:
At some point, you will want to take a break from making 9-patches and cut some triangles (you will need 238) and hexagons (you will need 110, although some will be trimmed to half-hexagons later).  That's only if you're making a quilt as big as mine; but you're on your own for calculating numbers if you change the size!  For both these shapes, it's important to remember that the Clearview Triangle markings help you figure out the height of the triangle or hexagon, but you are going for a 3" finished measurement along the sides, not the height.  For triangles, I cut strips that were 3 3/8" wide, and then I used the Clearview to subcut the triangle shapes.  I used a mix of pastels, and a few brights (red, turquoise, green).  The sides of the triangles are 3 7/8" in length.  But because of the angle, they will finish up to 3"  So, 238 equilateral triangles, cut from 3 3/8" strips.
Hexagons:
Cutting the white hexagons was more of a challenge.  I think I made a paper template for the first one and measured it.  What you do is to cut strips 5 5/8" wide.  Then, you press them in half lengthwise.  Then you place the 5 5/8" line of the Clearview Triangle on the folded edge, and the 2 3/4" line on the raw edge, and cut along the side angles.  Discard the little white equilateral triangles or save them in your crumb bin: they are too small to work as the triangles you need for this pattern.  You should be able to get 7 hexagons out of one strip; you need 110 total for a twin-size quilt.  When you measure the raw edge of the hexagon, it will be just a smidge over 3 1/4", but again, because of the angles, all the edges will finish to 3".
Arcs and Canoes:
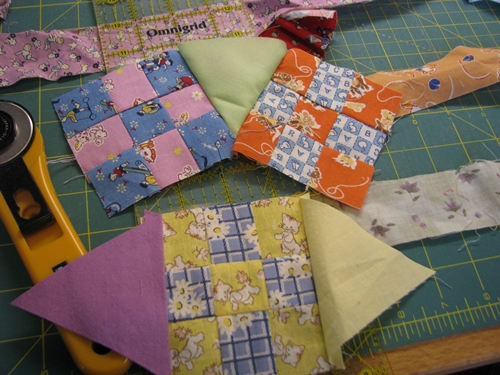
Now we're ready to join 9-patches and triangles into some of the elemental units that will later be formed into blocks.  If you're like me, you'll want to do a few blocks just to see where the pattern's going.  I call the two units above "arcs" and "canoes" because that's what they look like to me.  An arc is 2 9-patches connected by a triangle.  A canoe is 2 triangles connected by a 9-patch.  My quilt uses 112 arcs and 63 canoes.
Looking closely at how the triangles match up with the 9-patches, you can see that the 3" finished measurement is where you will need to start and stop stitching.  I drew little dots so you can see.  The triangle points extend a little beyond the straight edge of the 9-patch, but because of the angle, the lengths are just about exactly even along the future seamline, 1/4" in from the top edge.  You will need to backtack to secure the stitches at beginning and end of each seam.  I know, it's a bit of a drag if you're used to chain piecing and never stopping, using leaders and enders, etc.  You kind of have to get into a frame of mind where you are not primarily concerned about speed piecing, and you will be surprised at how fast it actually does go.  When you are piecing a unit and one seam meets another one, as in the arc unit, make sure to position the seam allowances for the first seam so they are not caught in the second seam.
Wheels and Apple Cores:
Now we are ready to begin constructing the blocks themselves.  There are three basic types of blocks; above is what I call a "wheel."  I made it by sewing two arc units onto opposite sides of a hexagon, and then adding two canoes on either side.  If you have a stack of arcs and canoes ready to go, you can make a wheel block with 10 seams, each of them 3" long.  My quilt needed 28 wheel blocks.
The second type of block is what I call an "apple core."  It consists of two arcs on opposite sides of a hexagon, just like the start of the wheel block.  There are 21 apple core blocks in my quilt.  By adding a single canoe unit to an apple core, you create an "end" block, needed for the end of each row in my quilt: I needed 7 of those.
Here's a view of one seam of a hexagon joined to a 9-patch.  You can see that where the triangle was longer than the 9-patch at the raw edge, the hexagon is a little shorter.  But it is even at the 1/4" seam line, which is where it counts.  Start and stop stitching at the point where the 1/4" seamlines cross.  I tend to eyeball it and it usually works.  And you do need to clip the threads close to the fabric after stitching.  Again, wherever you have multiple seams meeting at that 1/4" point, make sure not to stitch over the seam allowances.  Stitch back and forth a few times at the beginning and end of each seam.  I think it worked best if I avoided pressing the seams until after I had joined an entire row or even multiple rows of the quilt.
Rows:
For my quilt, I joined 4 wheels, 3 apple cores, and 1 end block to make a row that was 8 hexagons long.  That's the width of the quilt.  In addition, you will eventually need to piece the connector or "chain" rows.  In the above photo there are two regular rows and one connector row in between them.
My chain connector rows consisted of 8 9-patches alternating with 9 hexagons.  The two hexagons on either end will eventually be trimmed to half-hexagons.  And yes, when the quilt is ready for binding, I will be binding a very scallop-y, raggedy edge.  I will almost certainly need to use binding cut on the bias, not straight of grain.  It's similar to the technique used to bind a Double Wedding Ring quilt.  The alternative would be to cut with a rotary cutter to make a straight edge, and I don't think I would have the heart to do that!
Here's a shot of how I didn't work: I never used pins.  But you could certainly do so if you were concerned about hitting the right 1/4" intersection point, or keeping the seam allowances out of the way of the needle.  Remember that Jack's Chain has a different rhythm than most modern quilts: there's a lot of stop-and-start seaming, but the seams are short and regular, and you will very quickly get used to how the quilt goes together.

My final quilt had 7 regular rows and 6 chain connector rows, and is 67"x94" or twin size.  I didn't calculate everything out in advance, and I have enough extra blocks to make a baby quilt, which I'm working on now.  I did find that one very thorough pressing with steam at the end of all the set-in seaming was good: pressing before all the seams were joined meant I was more likely to have trouble with a seam allowance getting caught in the stitching.
If you find this tutorial helpful, please drop me a line or even send a photo of yours.  I'd love to see this pattern become more popular!


Tuesday, June 12, 2012

Graduation

A blur is how the last several days have been, anyway.  I can't apparently hold the camera steady at emotional moments, and there have been a lot of them.  In addition to his valedictory status, Primigenitus received the academic achievement award and some kind of award from Washington State.  I stopped trying to capture all the moments as they sped by.  Somebody will post them on Facebook or we'll eventually get copies.  Primigenitus might even let me get a copy of the text of his speech.
The choir never sounded prettier.
Pastor Bronson, previous owner of our house, came to give the commencement address at the school he helped to found more than 13 years ago.
Other people take blurry photos too.
Take two a little better.
Fortunately not all of them were blurry.
He should know everyone's very proud and happy.
Glad Grandma could be there too.
How about a photo of the photo collage?  That baby shirt was prophetic.
I remember my mother always used to cry when she said goodbye to her mother, my grandmother, after a visit as a child.  I always thought it was something strange my mother did.  Then when she dropped me off at college the first time, she started crying when she said goodbye to me.  I've never been that emotional, usually, but I'm starting to get a feeling that will change, rather too quickly for comfort, in the coming months and years.

Wednesday, June 6, 2012

WIP Wednesday

In the last week I finished a quilt (Framed In Quilt) and last Wednesday I blogged about my finished top for Jack's Chain.  Since then there hasn't really been a lot of time for sewing.  But I am using the extra blocks from Jack's Chain to make a baby quilt top, and I am planning a tutorial to share with blogland.  So consider this post a teaser for the tutorial, which will come out sometime in the next week, after Primigenitus' graduation (he's valedictorian, have I mentioned that at least 500 times yet?)

Short summary of needlework projects:
  • Jack's Chain twin size top - finished!
  • Jack's Chain baby quilt top - about 50%
  • Framed In Quilt - finished!
  • knitting Black Roses/ Lady MacBeth stole - about 60%
  • knitting Color Affection - about 50%
  • no progress on anything else needlework related
  • very little progress on final grades
Enjoy checking out the other progress over at Freshly Pieced!

Tuesday, June 5, 2012

Randomday, belated (also Emperor's Day)

Here are the Roman Honey Cakes I made for Emperor's Day today.  12 eggs, beaten in a stand mixer until thick, then honey (about 1 cup) drizzled in, then about 2 1/4 cups flour and some coriander.  Baked in a 350 oven for about 20 minutes.  The muffin-shaped ones have almonds on them, the square ones are plain, and the mini donut shaped ones are stuffed with dates.  They are now gone.
6th graders right before the competition began.
I teach some of the goofiest kids on the planet.
The assembled throngs of onlookers.  I provided togas for the coronation of 2 of the 4 emperors but was unable to take a picture because of scheduling issues.  Sniff.
Kathy H. has been working hard with the 5th-graders on verb forms.  They could probably beat my 8th graders at 4 principal parts.
I missed Randomday on Saturday.  I have quite a bit of random stuff saved up though, so I'm declaring belated Randomday today.

My son was in the newspaper today.  Next to the obituaries, because I think they left him out when they were doing valedictorian pictures of all the big schools yesterday.  (Kind of like that episode of the Middle where poor Sue Heck was listed in the yearbook under "in memoriam."  My life is so much like an episode of The Middle, it depresses me to watch the show). But the online version is quite nice.  And I actually took that picture of him.

I watched every televised minute of the Spelling Bee over the weekend, and wrote down all the words, because I am a total Spelling Bee geek.  Here they are:

Round 4:
  • cancrivorous
  • ditokous
  • polyptych
  • mumpsimus
  • carpophore
  • attermine
  • ergastulum
  • sylloge (that means someone went out on this word).
  • pidan
  • tendenz
  • sciophyte
  • toxophilite
  • frore
  • caryatid
  • exergue
  • douceur
  • mephitis (this is an Oscan-derived word.  I can't tell you how much this excited me).
  • stannum (in case you were wondering why tin has the chemical symbol it does).
  • pratincolous
  • bacitracin
  • monocotyledon
  • victorine
  • cataphract
  • enthymeme
  • survigrous
  • catallactics
  • phlogistic
  • tondino
  • cochineal (I knew this because of my fiber arts hobby).
  • pleurodynia
  • podilegous
  • dysthymia
  • habendum (This is a gerundive!  I'm adding it to my gerundive hunt list).
Round 5
  • hortulan
  • psychrophyte
  • compas
  • Liederkranz
  • lymphopoiesis
  • macropodid
  • cannelon
  • quinquennalia
  • athanor
  • rhabdolith
  • calo
  • fjeld
  • storis
  • cisele
  • aoristic (I love a word derived from a verb tense name!)
  • oecus
  • Gotterdammerung
  • tocopherol
  • mascalage
  • schwyzer
  • chamaephyte
  • atopen
  • perleche
  • trophobiosis
  • souterrain
  • bombycine
  • thysanopterist
  • maquillage
  • gimbaled
  • rhipidate
  • polos
  • theophylline
  • cabochon
  • araphorostic
  • resveratrol
  • contrecoup
  • soboliferous
  • patas
  • nudibranch (I was surprised to hear that the "ch" is hard, never having heard it pronounced)
  • allothogenic
  • Grundriss
Round 6:
  • quatuor
  • rhonchus
  • vellon
  • guilloche
  • polynee
  • capharnaum
  • cheyney
  • rapparee
  • bisbigliando
  • Gleichschaltung
  • pejerrey
  • ammocoetes
  • heian
  • kahikatea
  • ouabain
  • tirthankara
  • phrontistery
  • kanaima
  • cholecystitis
  • himation (totally knew this one too!  Greco-Roman culture again!)
  • pissaladiere
Round 7 (finals)
  • psammon (an E. Nesbit story helped with this one)
  • dedans
  • sahel
  • harengiform
  • canities
  • ridotto
  • maieutic
  • turnverein
  • otosteon
Round 8
  • ajimez
  • porwigle
  • melopoeia
  • phthisiology
  • distelfink
  • rouille
  • yttriferous
Round 9
  • luteovirescent (I love Latin.  It makes me feel so smart!)
  • chatoyant
  • ericeticolous
  • quattrocento
  • vetiver
  • geistlich
Round 10
  • saccharolytic
  • prolegomenon
  • schwannoma
Round 11
  • admittatur (I will just say that this is one word where the English pronunciation of a word could steer you wrong, because they pronounce that second a as in "say", not "father".  We have something called the Great Vowel Shift that changed the pronunciation of vowels in English.  I was tempted to spell it "admittetur" because that would be how it would be pronounced in Latin.  But I knew it came from the verb "mitto," which is 3rd conjugation, and it was subjunctive (let him be admitted), so the weird vowel was called for.  Which is "a" for the 3rd conjugation.  So Latin teacher logic would have saved me on this word.  But the contestants probably just had studied the word from a list.)
  • chionablepsia
Round 12
  • arondissement (easy for someone who took college French)
  • schwarmerei (German.  not so much)
and the winning word:
  • guetapens (no, I hadn't heard it before)
Well, that was fun.  It's the only time of year I watch ESPN.  How about you?  Are you smarter than an 8th grader?

Steve is watching coverage of the Queen's diamond jubilee taped from BBC.  Yesterday it was the boat parade on the Thames.  Cool stuff.

On, Wisconsin!

Monday, June 4, 2012

Design Wall Monday and Stash report

Two big finishes this last week: Jack's Chain is now a top awaiting quilting, 67"x94".  I am working on a tutorial for it but that may or may not happen this week because I have a graduating senior!  But in any case, stay tuned if you want a tutorial, it will happen!  (For now I'm re-using these photos from last Wed. and Fri.)

And the "Make it Blue" Framed In quilt is finished and bound... 63"x79".  My only fabric usage this week came from the binding: about half a yard of scrappy binding.  You can see more about this quilt in Friday's entry.

Stash Report:

Fabric used this week: .5 yards for binding
Fabric used year to date: 47.3 yards
Added this week: 0 yards
Added year to date: 27.2 yards
Net used for 2012: 20.1 yards

Yarn used this week: 0 yards (working on 2 shawls)
Yarn used year to date: 2506 yards
Yarn added this week: 0 yards
Yarn added year to date: 492 yards (all handspun, not purchased)
Net used for 2012: 2014 yards

Also linking up to Design Wall Monday.

Friday, June 1, 2012

Framed In Quilt - Finished!


This is Framed In, the gateway drug that started me off in the quilt blog world.  Just a little over a year ago, I stumbled on the pattern and pretty soon, I was following lots of quilt blogs, joining quilt-alongs and linkup parties, and the madness hasn't stopped yet.  Now it's a finished quilt.  63"x79", made entirely with scraps and stash fabric according to some self-imposed guidelines.  This is a really great pattern for quick piecing and using up scraps, as long as you have plenty of solid white.
 I backed it with a vintage sheet and quilted it with an allover squiggle-loop-star pattern.  It's pretty much everything a scrappy quilt should be.  Fresh and pretty, not at all pretentious, and with lots of memories stitched in.  (Scraps from old aprons, curtains, Quarta's big-girl quilt, Tertia's Easter dress, and so on).  I'm naming this one "Make it Blue" and it's the 3rd in a series of all-scrap quilts based on the old quilter's creed, "Use it up, wear it out, make it do, or do without."
I finished hand-stitching the binding down last night while watching the spelling bee.  I had an extra block that I cut up to make the label.  The quilting and finishing was my May UFO project for Judy L.'s challenge.  (June's will be interesting... it's a felted wool patchwork blanket made from patches of old sweaters... stay tuned.  Also stay tuned for the how-to/tutorial post on my Jack's Chain top.  I took a lot of photos for it but it will probably have to wait until after graduation and grades).