I'm going to take a break from the graduation, school, and family blogging and share my tutorial on how to piece a Jack's Chain quilt top. I finished this one recently and am really proud of it. It's a great, old-fashioned pattern. Yes, there are lots of inset seams, but I'm here to tell you they are not really that bad! I personally have never wanted to do the English paper piecing that is so popular with hexagon quilts right now... and you don't have to. This is all pieced on a machine, with intermediate sewing skills. My points are not always perfect matches, and I have found that I am a happier person if I don't worry about it too much. The overall effect is charming, and I can't wait to get this quilted and on my daughter's bed. So, I'd like to persuade you to attempt this little-known vintage pattern, sometimes also called Rosalia Flower Garden.
I started thinking about this pattern when I was browsing through non-square block patterns in Maggie Malone's
1001 Patchwork Designs. There are three blocks listed that combine squares, hexagons, and equilateral triangles in this unique way (the others are Merry-Go-Round III and Wedding Tile).
I like the way it creates a circular-looking pattern even though there are no curved lines to piece, and I thought it would be really cute in the 1930's reproduction fabrics I had been collecting. I also found the pattern on
Quilter's Cache (which is a fabulous resource for all sorts of quilt patterns, by the way!) Although Quilter's Cache does give step-by-step directions and templates, I don't really like using templates and so I bought a
Clearview Triangle ruler at a local quilt store. This makes it possible to cut both the equilateral triangles and the hexagons without templates. From that point, I did not really follow the Quilter's Cache piecing directions.
Here's the picture of page 2 of the Quilter's Cache Jack's Chain pattern. I did use it as a guide for assembling the rows. Complicating matters still further, this project became a UFO for a few years (I think I started it in 2007) and I didn't get back to it until this year when I've been participating in
Judy L.'s UFO project. I had divided the piecing of the top to be done over two months, and I groaned a little when the number for half of the piecing came up in April. But surprisingly, I found it was easy to make progress once I cleared some time to work steadily. I had already pieced a lot of the 9-patches and made enough blocks for a partial row of the finished top (which is 67x94"). I just needed to review and
actually write down how I had cut and measured the blocks I had already done before!
The Planning:
I wanted to use '30's reproductions for the 9-patches, white for the hexagons, and various pastel and bright solids for the triangles. (Many of these solid fabrics are vintage... my grandfather was a partner in a business college in Ohio, and my grandmother had in her stash the 1/2 yard lengths of rainbow colored cotton that were used in the
Nancy Taylor course, which was, I guess you would call it, a charm course for secretaries. So whenever I dig into my vintage solids, I imagine fashionable young women of the Mad Men era figuring out what colors were most flattering with their skin tones. I've read the books, and they are a hoot). The only significant yardage I required for this quilt was the white, and I think I used a little less than 3 yards of that. I have seen some examples of the Jack's Chain pattern online that use the
same white background fabric for the hexagons, triangles, and the 4-patches of the 9-patch. If you want to do this, be sure to plan ahead and buy more of the white fabric!
Here's the math that I should have done first, but didn't. I just plunged in.
9-Patches:
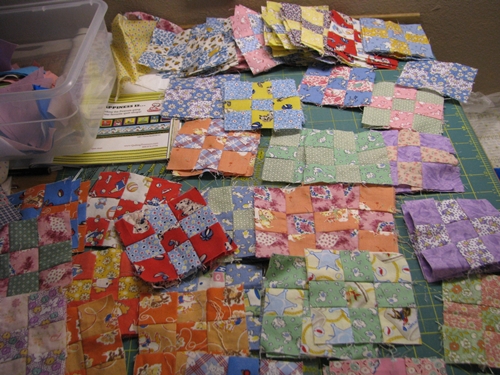
The very first step is to make lots, and I mean lots, of 9-patches that finish to 3". You will probably choose to do this with 1.5" strips, and your best bet is to pace yourself. If you make a twin-sized quilt like mine, you will need
335 9-patches that finish to 3" (but with raw edge included, they are 3.5"). That's a lot of 9-patches. I wanted a scrappy variety of vintage-looking prints, so I tried to use different combinations of the fabrics I had. I would keep thinking that, surely, I had enough 9-patches. But then I'd calculate and realize that, no, I actually did not.
Triangles:
At some point, you will want to take a break from making 9-patches and cut some triangles (you will need
238) and hexagons (you will need
110, although some will be trimmed to half-hexagons later). That's only if you're making a quilt as big as mine; but you're on your own for calculating numbers if you change the size! For both these shapes, it's important to remember that the Clearview Triangle markings help you figure out the height of the triangle or hexagon, but you are going for a 3" finished measurement along the
sides, not the height. For triangles, I cut strips that were 3 3/8" wide, and then I used the Clearview to subcut the triangle shapes. I used a mix of pastels, and a few brights (red, turquoise, green). The sides of the triangles are 3 7/8" in length. But because of the angle, they will finish up to 3" So,
238 equilateral triangles, cut from 3 3/8" strips.
Hexagons:
Cutting the white hexagons was more of a challenge. I think I made a paper template for the first one and measured it. What you do is to cut strips 5 5/8" wide. Then, you press them in half lengthwise. Then you place the 5 5/8" line of the Clearview Triangle on the
folded edge, and the 2 3/4" line on the raw edge, and cut along the side angles. Discard the little white equilateral triangles or save them in your crumb bin: they are too small to work as the triangles you need for this pattern. You should be able to get 7 hexagons out of one strip; you need
110 total for a twin-size quilt. When you measure the raw edge of the hexagon, it will be just a smidge over 3 1/4", but again, because of the angles, all the edges will finish to 3".
Arcs and Canoes:
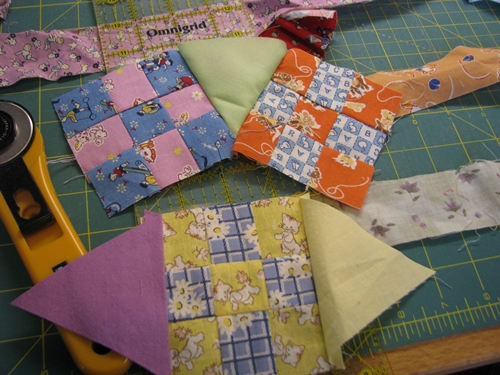
Now we're ready to join 9-patches and triangles into some of the elemental units that will later be formed into blocks. If you're like me, you'll want to do a few blocks just to see where the pattern's going. I call the two units above "arcs" and "canoes" because that's what they look like to me. An arc is 2 9-patches connected by a triangle. A canoe is 2 triangles connected by a 9-patch. My quilt uses 112 arcs and 63 canoes.

Looking closely at how the triangles match up with the 9-patches, you can see that the 3" finished measurement is where you will need to start and stop stitching. I drew little dots so you can see. The triangle points extend a little beyond the straight edge of the 9-patch, but because of the angle, the lengths are just about exactly even along the future seamline, 1/4" in from the top edge. You will need to backtack to secure the stitches at beginning and end of each seam. I know, it's a bit of a drag if you're used to chain piecing and never stopping, using leaders and enders, etc. You kind of have to get into a frame of mind where you are not primarily concerned about speed piecing, and you will be surprised at how fast it actually does go. When you are piecing a unit and one seam meets another one, as in the arc unit, make sure to position the seam allowances for the first seam so they are not caught in the second seam.
Wheels and Apple Cores:
Now we are ready to begin constructing the blocks themselves. There are three basic types of blocks; above is what I call a "wheel." I made it by sewing two arc units onto opposite sides of a hexagon, and then adding two canoes on either side. If you have a stack of arcs and canoes ready to go, you can make a wheel block with 10 seams, each of them 3" long. My quilt needed 28 wheel blocks.
The second type of block is what I call an "apple core." It consists of two arcs on opposite sides of a hexagon, just like the start of the wheel block. There are 21 apple core blocks in my quilt. By adding a single canoe unit to an apple core, you create an "end" block, needed for the end of each row in my quilt: I needed 7 of those.

Here's a view of one seam of a hexagon joined to a 9-patch. You can see that where the triangle was longer than the 9-patch at the raw edge, the hexagon is a little shorter. But it is even at the 1/4" seam line, which is where it counts. Start and stop stitching at the point where the 1/4" seamlines cross. I tend to eyeball it and it usually works. And you do need to clip the threads close to the fabric after stitching. Again, wherever you have multiple seams meeting at that 1/4" point, make sure not to stitch over the seam allowances. Stitch back and forth a few times at the beginning and end of each seam. I think it worked best if I avoided pressing the seams until after I had joined an entire row or even multiple rows of the quilt.
Rows:
For my quilt, I joined 4 wheels, 3 apple cores, and 1 end block to make a row that was 8 hexagons long. That's the width of the quilt. In addition, you will eventually need to piece the connector or "chain" rows. In the above photo there are two regular rows and one connector row in between them.
My chain connector rows consisted of 8 9-patches alternating with 9 hexagons. The two hexagons on either end will eventually be trimmed to half-hexagons. And yes, when the quilt is ready for binding, I will be binding a very scallop-y, raggedy edge. I will almost certainly need to use binding cut on the bias, not straight of grain. It's similar to the technique used to bind a Double Wedding Ring quilt. The alternative would be to cut with a rotary cutter to make a straight edge, and I don't think I would have the heart to do that!
Here's a shot of how I didn't work: I never used pins. But you could certainly do so if you were concerned about hitting the right 1/4" intersection point, or keeping the seam allowances out of the way of the needle. Remember that Jack's Chain has a different rhythm than most modern quilts: there's a lot of stop-and-start seaming, but the seams are short and regular, and you will very quickly get used to how the quilt goes together.
My final quilt had 7 regular rows and 6 chain connector rows, and is 67"x94" or twin size. I didn't calculate everything out in advance, and I have enough extra blocks to make a baby quilt, which I'm working on now. I did find that one very thorough pressing with steam at the end of all the set-in seaming was good: pressing before all the seams were joined meant I was more likely to have trouble with a seam allowance getting caught in the stitching.
If you find this tutorial helpful, please drop me a line or even send a photo of yours. I'd love to see this pattern become more popular!


43 comments:
I don't think I would ever have the patience to attempt something like this, but it is a gorgeous finished product! Nice work!
Wow this is so fancy and I love how you broke it down in the tutorial! It looks complex but more simple than I imagined.
That is amazing! Thank you so much for sharing this tutorial. Putting this on my to-do list. : )
Oh my God! This is a colossal work! I just love it! and your instructions so helpful. I will definitely try to copy this pattern!!!! I wonder how will you quilt it.
This is stunning - I love old-fashioned quilts! Sigh. I would love to make one, but with little ones underfoot, I'll have to wait a few years. But that means I get to build a stash for it first! Well done you!
Wow, that is awesome. Great tutorial
Wow! This has been on my list for a while, but I only had the Quilter's Cache instructions to go by. I don't know if I'm less or more terrified by yours! Very clear...and I think I'll start with some nice, safe nine patches. A lot of nine patches. Oh, and thanks to the link with the more white version. Adding that to my list now, too!
Thank you for sharing. it's a long time since I have seen this pattern. I have about 250 small 9 patches - all hand pieced which look perfect for this project. Thank you for the inspiration!
Cheers
Linda
Great quilt.
Just a super job on this quilt! I love the final out come - well done.
I just love how this quilt looks! Your lovely clear tutorial shows me that I probably don't have the patience to attempt it, but I really admire your achievement!
Thanks for the tutorial. I've bookmarked your page and will return. Actually...I already have quite a few 3 inch 9 patches just waiting for a project!
Thanks for sharing such a great tutorial, beautiful quilt top!
Quilting at the River Linky Party Tuesday
This is a wonderful tute. Thanks for sharing. This pattern has been cropping up in various forms lately. I am doing a variation called 'Faithful Circle'. I am doing it a English Paper Piecing. Here's a link to the latest post about it: http://www.thequilter.blogspot.com/2012/05/slow-stitching.html
I was directed here from Attic Windows in Grand Rapids, MI and was very pleased to see your quilt! WOW. I also don't think I will ever do one of these, but the results are stunning! Thanks for sharing!
OGM, that is gorgeous and I so want to make one. It will have to be one that starts this year and it will get done whenever it gets done!
These time consuming quilts just take a committment to the making of them, its a labour of love, thanks so much for sharing. You've inspired me to join in the Linky Tuesdays!
Thanks for the tutorial. It was very helpful. I found this on Pinterest today. Can't wait to use it to bust some of my scraps and strings. This is definitely on my 2013 to do list! Happy quilting and happy new year.
Great tutorial! I don't know if I will ever get the ambition to make one of these, but if I do now I know where to come for direction! Thanks!
Nice work! I love your version of this quilt. Now I must go and make 355 9 patches.
Thnk you for the tutorial. I have just started a Jack's Chain quilt and all I had was instructions of how to complete one square. I have all my 9 patches and triangles ready to go. I completed one square to see how it looked but had no idea how to construct the whole quilt your tutorial has been most helpful. I have now started sewing the different parts together as per your tutorial. Thank you.
I appreciate your post with all your pictures and steps defined so beautifully. Your finished quilt is amazing! I made this pattern twice as baby-quilts, by hand, and enjoyed the piecing process of geometric shapes so much! Thanks again for a beautifully presented and created quilt.
Thank you sooooo much for this tutorial! I really wanted to make a twin size quilt for my daughter in this pattern and dreaded the idea of doing it all by hand (it may have taken me until her 18th birthday - she's 3!). Your detailed instructions have ensured I will be able to get it done much much sooner!
Jenn
Well, I was so impressed with your gorgeous Jacks Chain quilt that I have made one too!!! But how to finish the edges? I too, cannot contemplate cutting the edges straight, so will have to put my thinking cap on to find a solution. Thanks for the great tutorial.
Thank you, sewable! I'm so glad you like the pattern enough to make one! There are some pictures of my finished Jack's Chain, including the binding, at this link: http://carpelanam.blogspot.com/2013/05/bloggers-quilt-festival-jacks-chain.html I recommend a basic double bias binding with 100% cotton quilt-weight fabric; sew it with a machine to the front of the quilt, keeping a strict 1/4" seam and pivoting at each corner. Then hand stitch the binding down on the back. This will mean you have to clip a little bit in the seam allowance on the inside corners, trim a little bit on the outside corners, and work the excess fabric in as best you can without puckering. It took a bit of time but I was happy with the way it came out. Best wishes!
Wow!! I'm a new quilter and love the this quilt top and your tutorial is so easy to understand I'm gonna give it a whirl. When I get it made I will post a picture. .I think I need to pray on this ine
Further to my previous post, I have completed my gorgeous Jacks Chain by inserting background triangles all round the outside, to straighten up the edge, then added a 2" background border. I then bound the quilt with strips from the 9 patch fabrics. I love this quilt, despite it being (or because of) one of the most difficult quilts I've ever made. If only I knew how to post a photo!
Fab tutorial:)
Just found your tutorial. Can't wait to start my own Jack's Chain quilt. Thanks for the tips you shared.
Very well explained thanks
Very well explained thanks
I found a picture of an old quilt made into Jack's chain pattern and decided to try it. It was easy to figure sizes of 9 patches & triangles based on the size of the hexagon tool I already had. But when it came to assembly, I was stumped! I could not find the name, let alone the pattern or instructions in any quilting book or magazine that belonged to me or my grandmothers! Your blog gave me the answers I needed to complete this quilt & not have it permanently in a box or drawer in pieces! Thank You!
I'm starting one.
Would this work using 2 1/2 strips to make the 9 patches?
would this work with 21/2 strips for the nine patches?
Just found it at quilters cache too. I love your instructions
Liddibeth... yes, it should work, you just need to also size up the triangles and hexagons to have the same finished length. For 2 1/2" strips for the nine-patches, the finished dimension of each nine-patch would be 6". That would be the finished measurement of the triangle sides and the hexagon sides as well. And the benefit would be a lot less piecing to get a bed-sized quilt! Thank you and I'd love to see pictures!
It is very useful information about Jack's Chain - the Tutorial From Basic To Intermediate.Vero Beach Tutoring Thanks for sharing this valuable information
Here i found nice environment to get new ideas and views and the i have read the comments of this blog Windermere Tutoring and these are really nice and it is glad to comment here.
I have one started and I thought I would be very clever and use the modified method, or the easy way. You sew the pieces in strips..no set in seams. I couldn't finish it, it is so ugly. Thank goodness I only did 2 rows. I am taking it apart and will use your tutorial and fo it the right way. I am not afraid of y seams or set in seams so why did I ever decide not to do it the right way, I will know..that's for posting this. I love your daughter's quilt. I hope she does too..
Would you please tell me which way you pressed the seams on the triangle? AWESOME job!!
Thank you for this tutorial. I am fascinated with this pattern and want to try it. A bed size quilt maybe too ambitious for me so I will start with a table runner. Thanks for inspiring me.
You have saved my bacon! I've been struggling with this all afternoon using a free pattern I found on the web. I could not get the pieces to come together properly. I think the pattern released has the wrong size for those triangles. I'm going to try your measurements against the pattern but I will likely go with yours since you were successful in getting it to work. Thanks.
Post a Comment